
Quick Answer
Cable management for sit stand desk setups starts with identifying which parts move and which stay fixed. Collect equipment leads in a tray, then use a flexible cable spine wherever the route connects a moving desktop to a fixed point. Check that the loose cables can reach before raising the desk. Organize them at its highest position, then inspect the entire downward and upward travel for pulling, pinching and snagging. On facing workstations, check each desktop independently against the fixed central tray.
Last Updated: September 17, 2026 | Author: William | Estimated Reading Time: 6 minutes
Choose the Cable Route for Your Workstation
Start by identifying which parts move. A tray attached beneath the desktop travels with the top. A tray attached to a stationary leg section stays at the same height. The cable between those two types of attachment needs room to change shape as the desk moves.
At B&H Ergonomics, we use the following arrangements for single desks, L-shaped desks and facing workstations.
| Workstation | Tray arrangement | Moving cable section |
|---|---|---|
| Single desk | Tray fixed beneath the desktop or clipped to its supporting crossbeam | From the moving desktop assembly toward the fixed external supply |
| L-shaped desk | Similar tray arrangement, with equipment leads collected from both wings | From the moving assembly toward the fixed external supply |
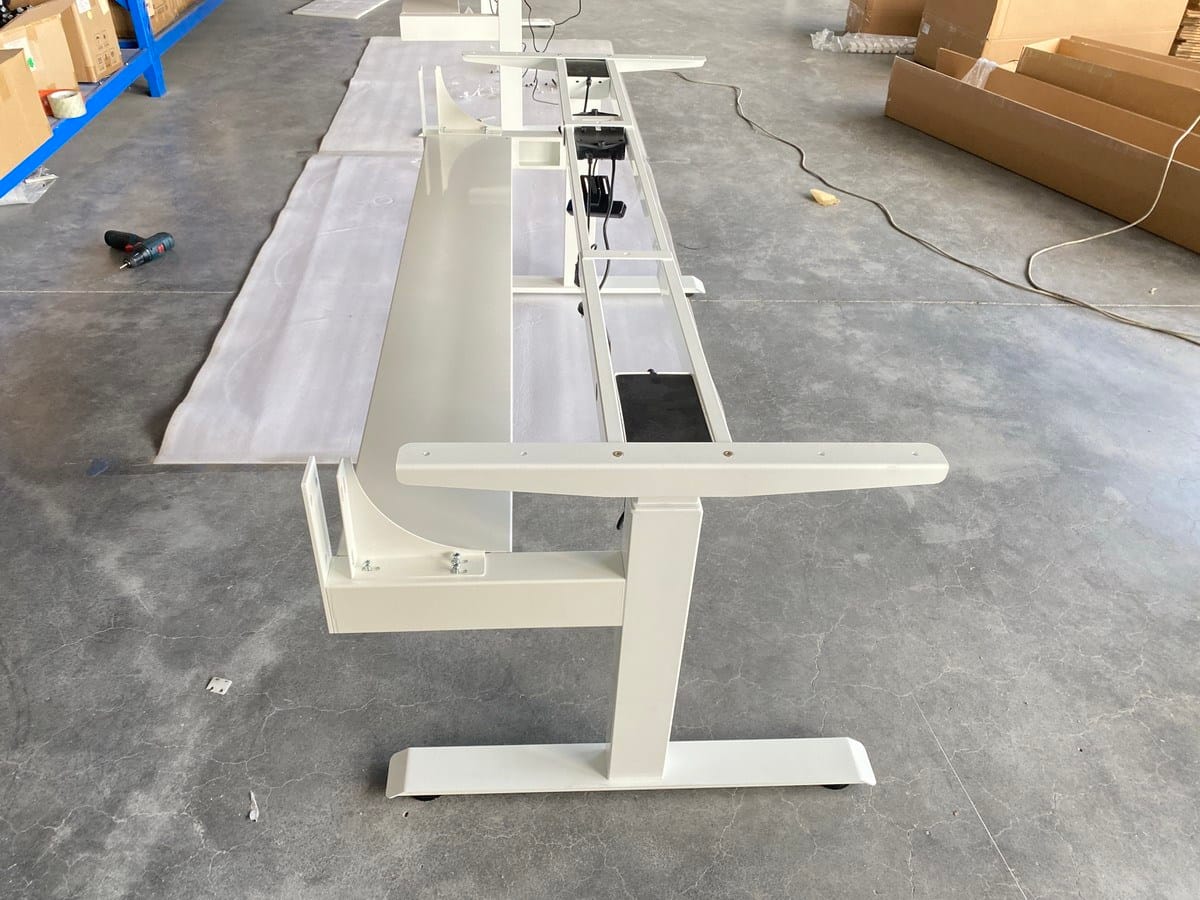
| Desk with our tray-supported acoustic screen | Larger tray extending outward from the stationary outer tubes of the legs; screen mounted to the tray | Between the moving desktop and the fixed tray |
| Facing two-person workstation | Shared central tray fixed to the stationary outer leg tubes; screen mounted to the tray | A separately managed run from each moving desktop to the fixed shared tray |
Single Desks and L-Shaped Desks
Collect the equipment leads beneath the top, then bring the outgoing cables together into a cable spine attached at the desktop. The spine guides the hanging run toward the external power connection.
For an L-shaped desk, trace the leads from both wings before choosing the spine position. A printer on the return and a monitor on the main wing can have very different cable routes. Follow the actual route around the frame when checking length.
Desks with Acoustic Screens
For our tray-supported screen configuration, the larger cable tray mounts to the stationary outer tubes of the desk legs and extends outward to support the screen mounting. Both the tray and the screen remain at a fixed height while the desktop rises and lowers.
Route the cables from the moving desktop to this fixed tray through a suitable flexible run. Check the clearance between the desktop, tray, screen brackets and cable entry throughout the movement. This arrangement needs a different cable-length check from a tray that travels directly beneath the top.
Facing Workstations with a Shared Tray
Our facing workstation arrangement uses a fixed central shared cable tray. The screen mounts to that tray, and each desktop’s cable spine connects its moving cable run to the central tray.
Plan the two sides separately. One person can be seated while the other stands, so each cable run must accommodate its own desk position without pulling on the other side’s connections.
Separate Desktop Wiring from the Moving Cable Run
Group the wiring by its attachment points. Leads connecting equipment carried entirely by the desktop can be organized beneath it. Leads running to a wall outlet, a floor-level computer or a fixed central tray need an allowance for desk movement.
A cable tray collects the horizontal wiring. A cable spine guides the section that changes position. Adhesive-backed cable ties or straps secure smaller runs beneath the top.
For the desk’s supplied motor wiring, B&H Ergonomics uses adhesive-backed ties beneath the desktop. Follow the frame’s wiring instructions, keep connectors accessible and secure the cable without pulling its connections tight. Keep the routed lead clear of the telescoping column sections.
Position the tray around the installed hardware. Monitor-arm clamps, screen brackets and frame members all need their intended mounting space. Check those positions before fastening the tray or adhesive mounts.
Organize Cables at the Highest Position
Our recommended starting point is to organize the cables with the desk at its highest position. This exposes the length needed by the upward travel before the cables are enclosed in the spine.
First check that the loose cables can reach that position. Trace every connection to a fixed point, including the desk’s own power supply. Resolve short leads before moving the desk; keep the controller within reach during the first check.
- Raise the desk while watching the loose cable route. Follow the desk’s operating instructions and stop immediately if a lead begins to tighten or catch.
- Lay each cable along its intended path. Include the horizontal distance from the device to the tray, the route through the spine and the remaining distance to its connection.
- Leave relaxed connections at both ends. The plug or socket should not carry the tension of a stretched cable.
- Place the leads into the spine. Follow its installation instructions and leave it able to bend through the intended movement.
- Lower the desk and watch where the spare length goes. Adjust the route if the spine or a loop contacts the tray, frame, floor or nearby furniture in a way that restricts movement.
There is no single extra cable length that fits every workstation. Outlet position, attachment height and the horizontal route all change the requirement. Measure along the installed path rather than using the desk’s vertical travel alone.
For a spine connected to a fixed tray, inspect both end positions carefully. The highest setting is a useful starting point for organizing, but the lowest setting also changes the distance and shape between the attachment points.
Check Both Desks on a Shared Workstation
A tidy central tray can hide a short lead. Trace each desk’s cables through to their individual connections, then check these four arrangements:
- Both desktops at their lowest position.
- Desk A at its highest position and Desk B at its lowest.
- Desk A at its lowest position and Desk B at its highest.
- Both desktops at their highest position.
Move one desk at a time during the initial inspection. Watch its cable spine, the central tray entry and the connections belonging to the other desk. Keep each desk’s moving leads independently managed so adjusting one side cannot tighten the other side’s bundle.
Plan Power and Data Access Before Ordering
B&H Ergonomics can customize power and data interfaces for project requirements. Specify the connection types, quantities and desired access positions, together with the destination’s power requirements.
Mark whether each interface will sit on a moving desktop or on the fixed assembly. That decision determines which connecting leads need movement allowance. Confirm the selected module’s specifications and installation requirements with the project configuration.
When comparing B&H Ergonomics commercial sit-stand workstation options, include the screen mounting, tray position and outlet locations in the layout brief. These details determine how the workstation will be wired and serviced.
Run a Full-Travel Cable Check
The Canadian Centre for Occupational Health and Safety’s sit-stand desk guidance advises that cables, electrical access, storage and the general layout should not make desk adjustment difficult. Inspect the complete installed arrangement before handing it over.
Keep the movement path clear and be ready to stop the desk immediately. Stop its movement before reaching under it to adjust a cable, and follow its instructions for disconnecting power where required.
| Check | What a satisfactory result looks like | Result / action |
|---|---|---|
| Highest position | No cable is taut and no connector is being pulled | _ |
| Lowest position | Extra length folds or hangs without becoming trapped or obstructing the mechanism | _ |
| Between end positions | Spine and leads move freely past the frame, tray edges and nearby furniture | _ |
| Fixed tray and screen | Desktop and cables clear the stationary tray, screen and brackets | _ |
| Facing workstation | Each desk moves independently without pulling the other desk’s leads | _ |
| Motor wiring | Ties remain attached, connectors stay secure and cables clear moving column sections | _ |
| Equipment connections | Power, monitor and data connections remain secure after the travel check | _ |
Record the workstation ID, the issue found and the correction before repeating the check. Recheck the route after adding a monitor, relocating a computer or changing an outlet connection. Each change can alter the length needed between the desktop and a fixed point.